|
OpenMS
|
To create a new TOPPAS file, you can either:
File > New .toppas and double-click it (on Windows systems all .toppas files are associated with TOPPAS automatically during installation of OpenMS, on Linux and MacOS you might need to manually associate the extension)When you start TOPPAS, you will see the main window with a list of TOPP tools on the left side.
The following figure shows the TOPPAS main window and a pipeline which is just being created.
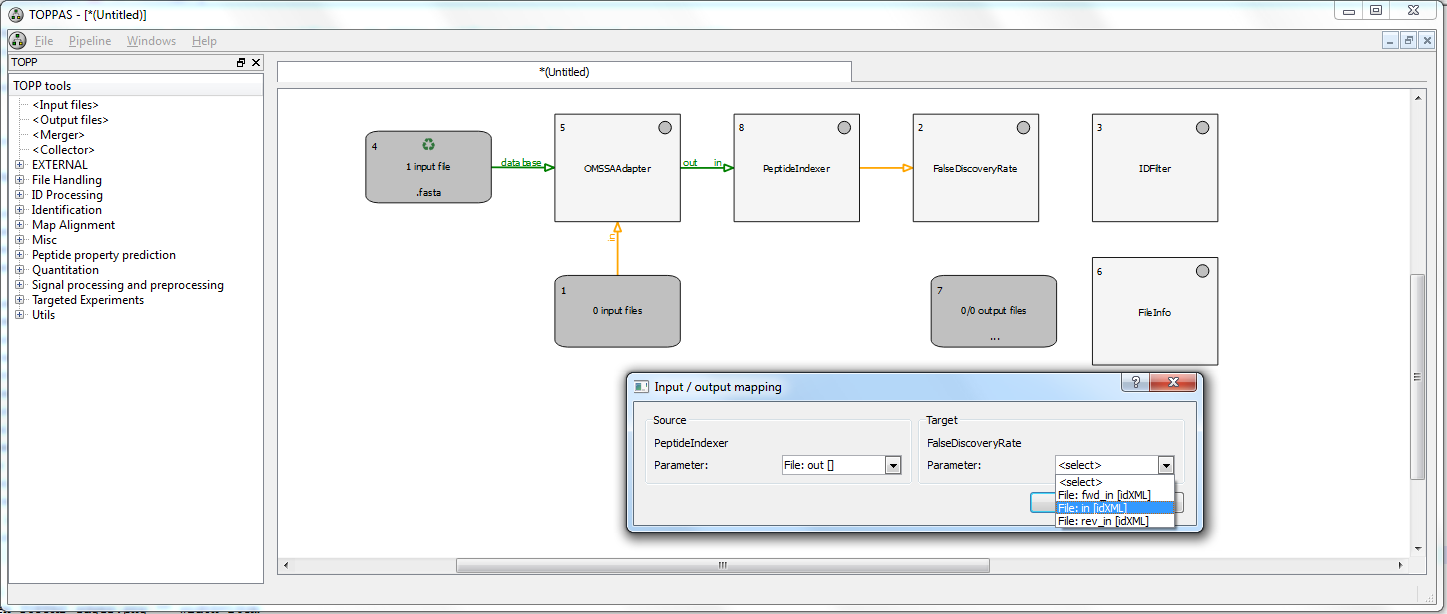
The user has added some tools by drag&dropping them from the TOPP tool list on the left onto the central window (double clicking an item in the tool list also works). Additionally, the user has added nodes for input and output files. There are also some more advanced features in this pipeline, like the use of Recycling Mode in Input File #2 (see On "Recycling" mode down below). You can arrange the tools/nodes on the canvas freely by left-clicking them with the mouse, such that they become selected (bold) and then dragging (i.e. left-click and keep the mouse button pressed) them to their desired position with the mouse.
Edges determine the data flow of the pipeline. Connections can be drawn by dragging (i.e. left-click and keep the mouse button pressed) the mouse from the source to the target node. Before starting the drag, make sure that you de-select any node or edge by left-clicking anywhere on the white canvas background. When a connection is created, and the source (, or the target) has more than one output (, or input) parameter, an input/output parameter mapping dialog shows up and lets the user select the output parameter of the source node and the input parameter of the target node for this data flow - shown above for the connection between FalseDiscoveryRate and IDFilter. If the file types of the selected input and output parameters are not compatible with each other, TOPPAS will refuse to add the connection. It will also refuse to add a connection if it would create a cycle in the workflow, or if it just would not make sense, e.g., if an edge points to an input file node.
If an edge is painted orange which indicates it is not ready yet. Usually, because no input files have been specified.
A green edge indicates that the edge is ready to be executed.
A red edge indicates that the edge is not ready to be executed, e.g., because the input files are not compatible with the tool's input requirements.
The input/output mapping of connections can be changed at any time during the editing process by double-clicking an connections or by selecting Edit I/O mapping from the context menu which appears when a connection is right-clicked. All visible items (i.e. connections and the different kinds of nodes) have such a context menu. For a detailed list of the different menus and their entries, see TOPPAS Menus .
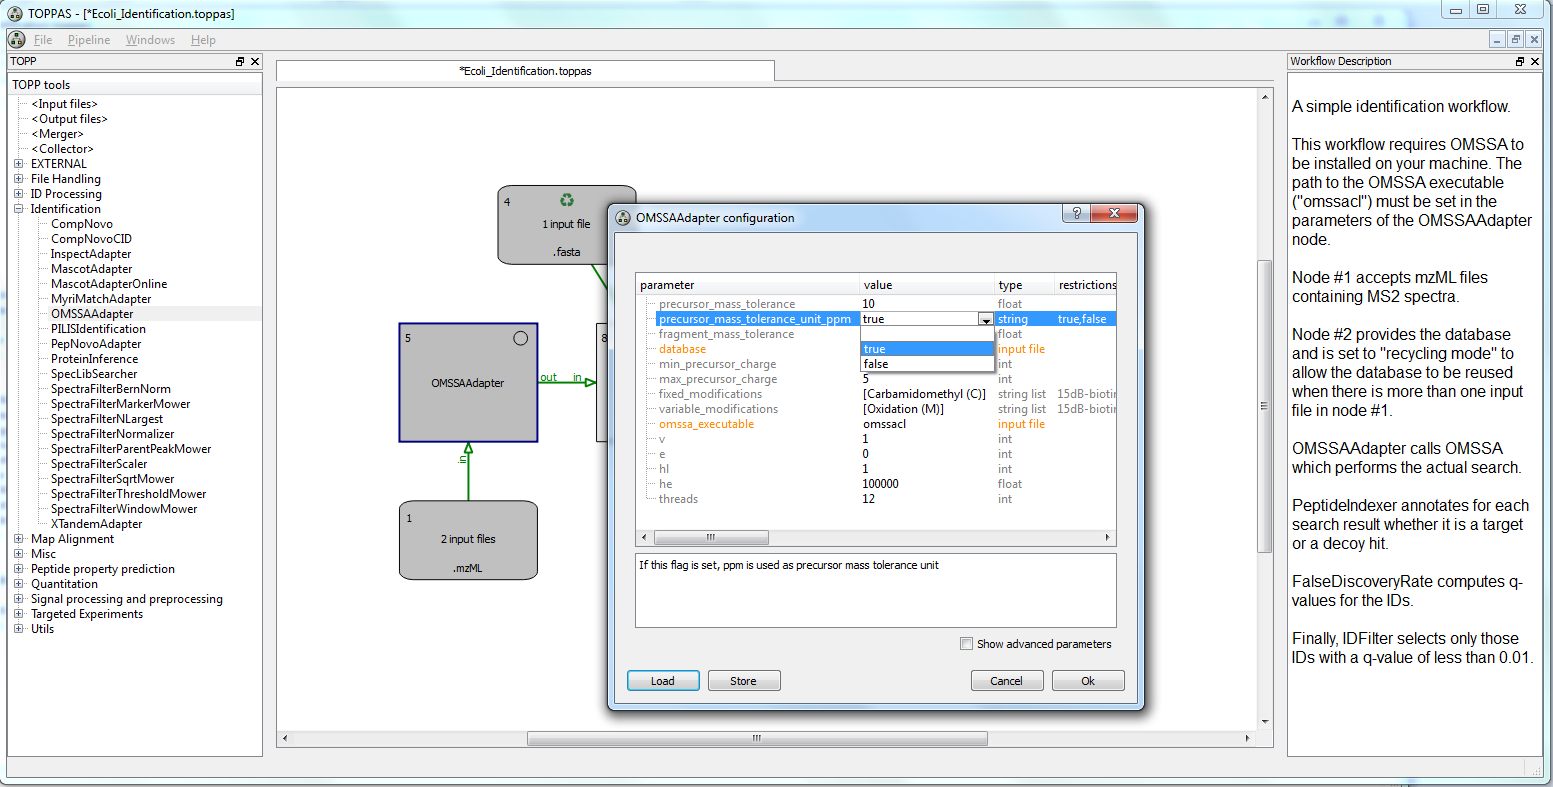
TOPP tools can be configured by double-clicking the tool node. By default, the standard parameters are used for each tool. Alternatively, right-click the tool and select Edit parameters.
Once the pipeline has been set up, the input files have to be specified before the pipeline can be executed. This is done by double-clicking an input node and selecting the desired files in the dialog that appears. You can also drag'n'drop files from your file manager into the dialog to add them to the list.
Output files from any TOPP tool in the pipeline can be stored permanently (i.e., after the pipeline has finished and TOPPAS is closed) by adding either of these nodes after any TOPP tool:
output files nodeoutput folder nodeYou should use these output nodes to store the results of any TOPP node you may need later on; typically the TOPP nodes which come last in the pipeline. If you do not add output nodes, the results from TOPP nodes will be stored in the temporary folder and will be deleted when you close TOPPAS. You can add multiple output nodes at different places in the pipeline to store intermediate results, if you feel you need them later on.
See Output and temporary files and Running the pipeline for more information on output and temporary files.
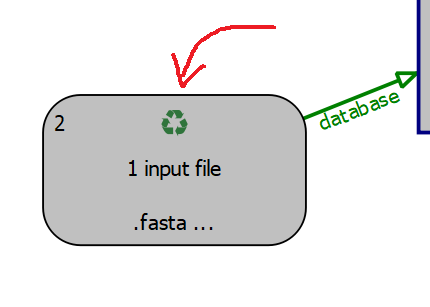
Input nodes and all TOPP nodes have a special mode named "recycling mode". Imagine a typical node, such as CometAdapter. Every time it runs, it consumes a single mzML file and a single FASTA file. Thus, the node has two input edges, one for the mzML file and one for the FASTA file. In a typical workflow, you have a bunch of mzML files, say five, in one input files node, but only one FASTA file the other input files node. CometAdapter will run five times. This is what we call a 'round', i.e. one invocation of the node. If you want to run CometAdapter with the same FASTA file for all five mzML files, you can set the FASTA input node to "recycle" the FASTA file. The alternative would be to have five identical FASTA files in the input node, which is not very elegant.
The input from a recylced node can be used an arbitrary number of times, but the recycling has to be "complete", i.e. the number of rounds of the downstream node (CometAdapter in our example) have to be a multiple of the number of input files. Typically, the number of items to be recycled is 'one' (e.g. one FASTA file), so this usually not a problem.
Recycling mode can be activated by right-clicking the input node and clicking the Toggle recycling mode entry from the context menu.
See On connections (=edges) for an example of a recycling input node.
Sometimes, it is necessary to merge or collect files from different input nodes. This is where the Merger and Collector nodes come into play.
As its name suggests, a merger merges its incoming file lists, i.e., files of all incoming edges are appended into new lists (which have as many elements as the merger has incoming connections). All tools this merger has outgoing connections to are called with these merged lists as input files. All incoming connections should pass the same number of files (unless the corresponding preceding tool is in recycling mode). For example, if a merger has three incoming connections, it will pass on a list of three files to the next tool. This will happen as often as each incoming connection has files.
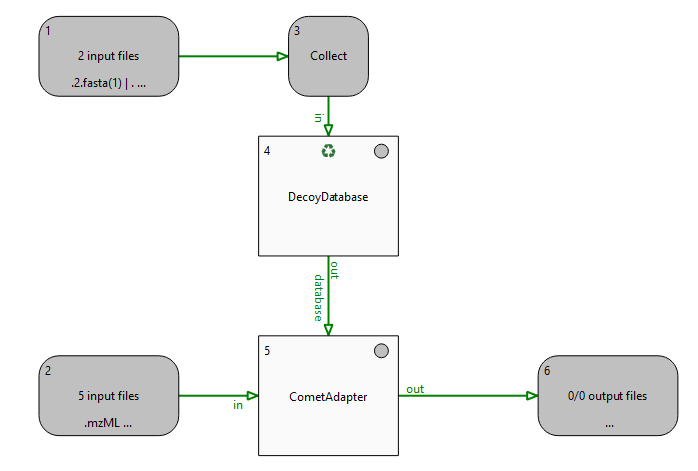
A collector node, on the other hand, waits for all rounds to finish before concatenating all files from all incoming connections into one single list. It then calls the next tool with this list of files as input. This will happen exactly once during the entire pipeline run. Typically, a collector node is used to collect all files from a FeatureFinder node (which is invoked many times, once for each raw file) and pass the list of resulting featureXML files to a MapAligner tool (which runs only once, on all featureXML files simulaneously).
Another common example for a collector is upstream to a DecoyDatabase node, where you usually want to combine a species-specific database (e.g. human proteome), with a contaminant database (e.g. cRAP). The pipeline below thus combines two FASTA files, given in input node #1 by invoking DecoyDatabase once with a list of two files. DecoyDatabase's output is then recycled and fed into CometAdapter repeatedly (5 times to be exact, since there are 5 mzML files in input node #2).
There is also a splitter node, which is the opposite of a collector, but it should be required only in very rare cases.
Finally, if you have input and output nodes at every end of your pipeline and all connections are green, you can select Pipeline > Run in the menu bar or just press F5.
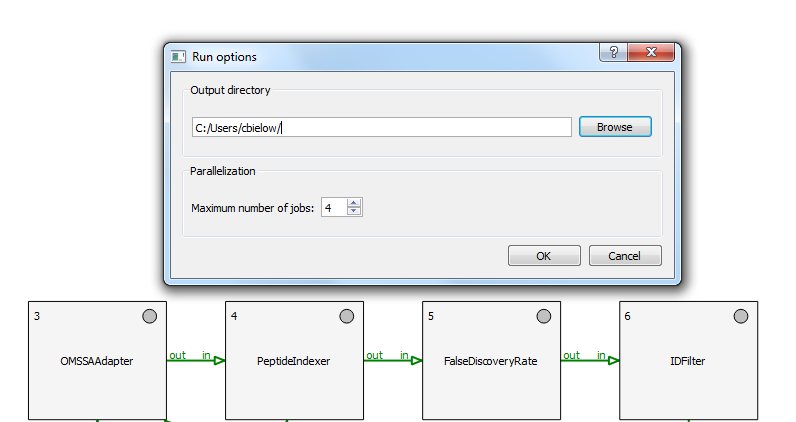
You will be asked for an output file directory where a sub-directory, TOPPAS_out, will be created. This directory will contain your output files. Also, you can specify the number of jobs (i.e. TOPP tool invocations) that TOPPAS is allowed to run in parallel (see On parallel execution below for details).
During pipeline execution, the status lights in the top-right corner of the tools indicate if the tool has finished successfully (green), is currently running (yellow), has not done anything so far (gray), is scheduled to run next (blue), or has crashed (red). The numbers in the bottom-right corner of every tool show how many files have already been processed and the overall number of files to be processed by this tool. When the execution has finished, you can check the generated output files of every node quickly by right-clicking on the node and selecting Open files in TOPPView or Open containing folder from the context menu.
In addition to TOPPAS_out, which holds all files captured in output files and output folder node of the pipeline, a TOPPAS_tmp directory will be created in the OpenMS temp path (call the OpenMSInfo tool to see where exactly). The TOPPAS_tmp will contain all temporary files that are passed from tool to tool within the pipeline. Both folders contain further sub-directories which are named after the number in the top-left corner of the node they belong to (plus the name of the tool for temporary files).
TOPPAS_out directory are not automatically deleted after the pipeline execution. These are your results! You have to delete them manually if you don't need them anymore. Files in the TOPPAS_tmp directory are deleted automatically upon closing the pipeline or the TOPPAS GUI.You can specify the number of jobs (i.e. TOPP tool invocations) that TOPPAS is allowed to run in parallel in the "Run dialog" (after pressing F5). If a number greater than 1 is selected, TOPPAS will parallelize the pipeline execution in the following scenarios:
Be careful with this setting, however, as some of the TOPP tools require larger amounts of RAM (depending on the size of your dataset). Running too many parallel jobs on a machine with not enough memory may cause problems. Also, do not confuse this setting with the threads parameter of the individual TOPP tools: every TOPP tool has this parameter specifying the maximum number of threads the tool is allowed to use (although only a subset of the TOPP tools make use of this parameter, since there are tasks that cannot be computed in parallel). Be especially careful with combinations of both parameters! If you have a pipeline containing the FeatureFinderCentroided, for example, and its threads parameter is set to 8, and you additionally set the number of parallel jobs in TOPPAS to 8, then you may end up using 8*8=64 threads in parallel (if you have 8 or more input files), which might not be what you intended to do.
With newer versions of OpenMS, some parameters of established TOPP tools may change. To use TOPPAS pipelines which have been created using older versions of OpenMS you may sometimes need to update the tools parameters. In extreme cases the pipeline will not run through completion and fail, if some tools parameters have been given other names. The more common case is that tools have received new parameters, e.g. to tune an algorithm, which you do not see and cannot edit in TOPPAS unless you update your pipeline.
You can update a pipeline by selecting File -> Refresh parameters, or press Ctrl + Shift + p.
In rare cases, TOPPAS cannot find a match between renamed parameters, e.g., imagine an input parameter was renamed from -in to -in_spectra. TOPPAS may not find this renamed parameter. TOPPAS will report a broken pipeline in this case and color broken edges in red. You then need to delete this edge and add a new one.
Details of the update process will be shown in the Log Window at the bottom.
Sometimes you want to switch to a new search engine, e.g. from MSGF+ to Comet or vice versa. Or from one type of MapAligner to another.
You could simply remove that node and add a new one. Easy, right? But you would loose all custom parameters settings, which differ from the default parameters, forcing you to edit the parameters of the new tool to match the old parameters.
TOPPAS has an easy way to transfer parameter values from one tool to another, given that the parameters share the same name. This usually only makes sense if the tools are from the same category (e.g., both are search engine adapters).
To transfer parameters do this:
Ctrl on the keyboard, then left-click and drag from the old node to the new node with the mouse — just like creating a connecting edge between nodes while holding Ctrl. You will see that the edge color is purple.In the Log Window below you can read which values have been transferred to the new tool (and which ones could not be matched). E.g. it may say:
    Transferring parameters between nodes ...
    Unknown (or deprecated) Parameter 'comet_executable' given in outdated parameter file! Ignoring parameter.
    Default-Parameter 'precursor_mass_tolerance' overridden: '10' --> '15'!
    ...
Now you can delete the old node and reconnect the new node. Done.
Using the mouse, you can
CTRL while clicking)CTRL and dragging the mouse in order to "catch" items with a selection rectangle)
Using the keyboard, you can
DEL or BACKSPACE)+ / -)F5)F1)
Using the mouse+keyboard, you can
CTRL while creating an edge) The edge will be colored as dark magenta to indicate parameter copying.Main Menu bar:
In the File menu, you can
New)Open)Open example file)Include)Save / Save as)Export as image)Refresh parameters)Close)Load / Save TOPPAS resource file)
In the Pipeline menu, you can
Run)Abort)
In the Windows menu, you can
In the Help menu, you can
OpenMS website)TOPPAS tutorial)
Context menus:
In the context menu of an input node, you can
In the context menu of a tool, you can
In the context menu of a Merger or Collector, you can
In the context menu of an output node, you can
Next up: Examples .
 1.9.1
1.9.1 
